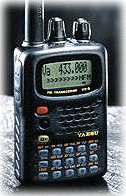

| Updated 10 November 2003 | Yaesu Vertex VX-5R Technical |
 MMI Stuff Technical Arizona Stuff Arizona Frequencies |
 General
RX: 0.5-16MHz, 48-729MHz, 800-999MHz (Cell blocked) TX: 50-54MHz 144-146 or 144-148MHz 430-440MHz or 430-450MHz Nominal: 7.2VDC, Negative Ground Operating: 4-9VDC Internal Battery 10-16VDC, Netgative Ground (Ext DC jack) 150mA (Receive) 55mA (Standby, Saver Off) 25mA (Standby, Saver On) 400µA (Auto Power Off) 1.6A (5W TX, 50MHz) 1.7A (5W TX, 144MHz) 1.9A (4.5W TX, 430MHz) Receiver 1st: 47.25MHz (N-FM), 45.8MHz (W-FM) 2nd: 450kHz (N-FM), 10.7MHz (W-FM) 0.5µV for 10dB S/N (0.5-16MHz, AM) 0.9µV for 12 dB SINAD (76-108MHz/174-222MHz/470-729MHz, W-FM) 0.16µV for 12 dB SINAD (50-54MHz/144-148MHz, N-FM) 0.18µV for 12 dB SINAD (430-450MHz, N-FM) Transmitter 5W (@ 13.8V Ext DC Input) 50/144/430MHz 5W (@ 7.2V, 50MHz/144MHz) 4.5W (@ 7.2V 430MHz) Features Accessories Download VX-5R Manual Serial Numbers For all Yaesu/Vertex radios that I've seen, the serial numbers are in the format of YPXXXXXX where "Y" is the production year, "P" is the production run and "XXXXXX" is the radio's unique number. Alignment Connect the radio to a regulated 7.5VDC power source for use on all steps. To access your Alignment Menu, set the radio to the center of the 6M, 2M or 70CM band, turn the radio off and hold [BAND]+[TXPO]+[0] while powering up. To move through alignment menu items, use the DIAL. Note that the first few items (excluding HIS SQL) are not adjustable. To make an alignment, press [MR], inject the RF signal of the center frequency and press [MR] to store the setting. On manual adjustments, press [MR], rotate DIAL for desired setting, and press [MR] to store the setting. To exit the alignment menu and save all changes, press [HOME]. Inject RF signals with a 1kHz tone at ±3.5kHz deviation. It is suggested that you refer to the "VX-5R Technical Supplement" provided by Vertex Standard. I am not responsible for any damage you may cause your radio.
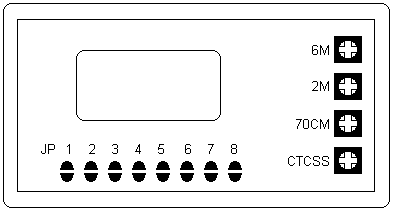
Deviation Adjust Below is a view of the deviation adjust pots. These can be found under the plastic sticker inside the battery compartment of your radio. Only if needed, set the deviation on 6M, 2M and 70CM to ±3.7-4.0kHz (inject a 1kHz audio tone at a level of 80mV rms to the mic jack) and the CTCSS deviation to ±0.6-0.8kHz. Only adjust these points if out of spec.  Transmit Coverage Modification Use the above graphic for this mod. The jumpers can be found under the plastic sticker inside the battery compartment of your radio. To get MARS/CAP frequencies, unsolder jumper 4. To get all available transmit frequencies (or Freeband) unsolder jumper 5 along with jumper 4. Afterwards, do a full µP reset by holding down [MR]+[VFO]+[4] while powering radio on.
Selecting Priority Channels Even though it is not explained in the manual, it is possible to change your Priority channel to something other than channel one. You can do this by holding [FW] for one second, selecting the desired Priority channel via the DIAL, and momentarily pressing [BAND]. A "P" will appear next to the channel number when that particular channel has been selected as the Priority. There can only be one Priority channel at a time. Alphanumeric Keying Shortcuts While entering the name of channels on your VX-5R, you don't have to twiddle the knob so much. Instead you can use the following buttons to repeat the last entered character [FW], skip to the beginning of character sets like A, Z, a, z, etc. [HM/RV] or you can skip in reverse [TX PO]. These shortcuts have proven time and time again to cut down on knob twiddling. VX-5R Pocket Reference Your VX-5R is in your pocket. Your friend wants a demo and The manual is at home. Now, there is a Pocket Reference for the VX-5R! It fits in your pocket along with the rig. Wherever you are, you can have at your fingertips the information you need to use all those VX-5R features. Includes information on all the control, DTMF, memory, keypad, receiver, scan, tone, transmitter and ARTS (Auto Range Transpond System) operations. Also includes things not found in the manual such as frequency information, user tips, menu summary, LCD display details, antenna alternatives, extensive index and cross referenced pages. Easy VX-5R Editor (EVE) There are two parts to EVE VX-5R programmer. The first part is Ver50, which contains all the necessary drivers for uploading and downloading. The second part is EVE, which is the graphical user interface(GUI). Download both files and unzip them to the same directory. EVE VX-5R can edit all memory channels, and all other functions of the radio. You can even perform Mars/Cap or Freeband mods to your VX-5R with EVE. There is a small problem with EVE; if you do not upload the contents of your VX-5R to EVE first, then EVE defaults the Home channels to 0.00Mhz. When you try to access any home channel with 0.00Mhz in it, the radio will lock up. Most people have been uploading the contents of their VX-5R to EVE first, then editing their memory channels, so no problem will occure. The problem comes up when you open EVE and just start editing the memory channels with nothing uploaded to EVE. It is recommended that everyone first upload the memory contents to EVE before editing anything. This holds true for new/reset as well as programmed VX-5R's. Once you have saved your radios file in EVE, then everything should be just fine. Note: It is normal for newer VX-5R's when read by EVE, to show up as "Japan" instead of "USA" for its country code. This has to do with the newer CPU's used in the newer VX-5R's. There is no need to select "USA" for it's country code, just select the 4th box for Mars/Cap, or select the 5th box for Freeband if you intend to mod your radio. Also, if you hold your mouse over any of the 5 boxes for a few seconds, text will pop up stating what each "virtual jumper" does. Courtesy http://home.comcast.net/~sllewd/ Downloads
|